Custom Guides
Guides are really just virtual containers for custom entries that allow you to keep track of which terms apply to which copy. Guides are another tool Lingofy offers for customization based on content or workflow. You can use them to organize entries based on project, department, language, client, topic and more. We called them guides so you’d know they are virtual sets of proofing rules that may be targeted at a specific type of content, client or project. You can add guides to proofing profiles and then proof content from the Lingofy extension. We’ll explore your customization and organization options here, but how you employ them is up to you.
The image below shows the Guides page in Lingofy Manager. We’ve circled the Lassiter Architecture Firm guide as it shows there. Note the buttons at top right for “New Style Guide” and “Link Guides,” which we explain below.
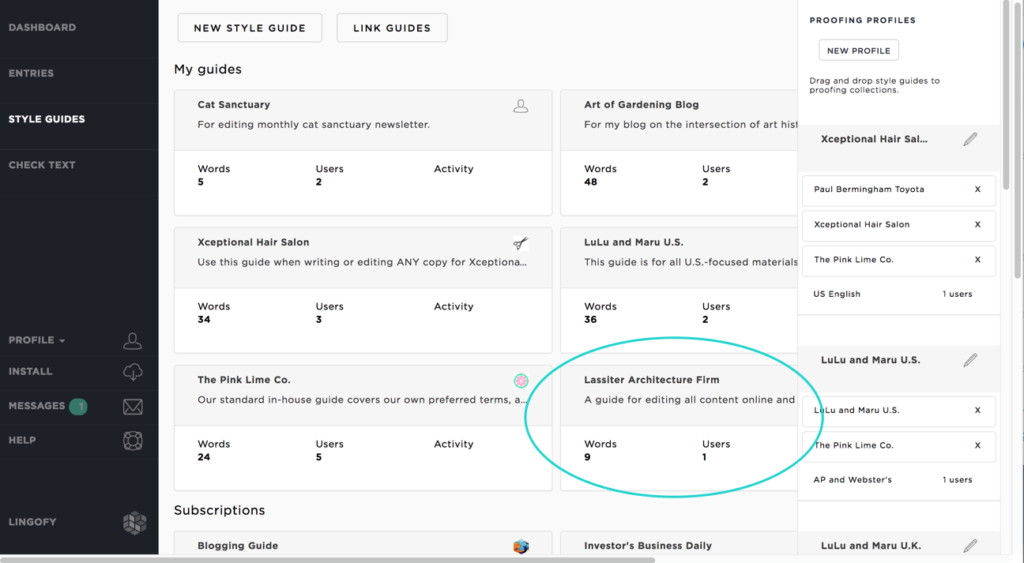
Tip: Guides must be added to proofing profiles to show up in your Lingofy extension menu.
New Guide

Create a new “container” for entries using the “New Style Guide” button. You can organize terms by housing them in guides to better manage different terms for different projects, regions or languages. If you share a guide, you can also set permissions about which users can view or edit entries.
From the Style Guides page, hit the “New Style Guide” button to bring up the “Add Guide” form.
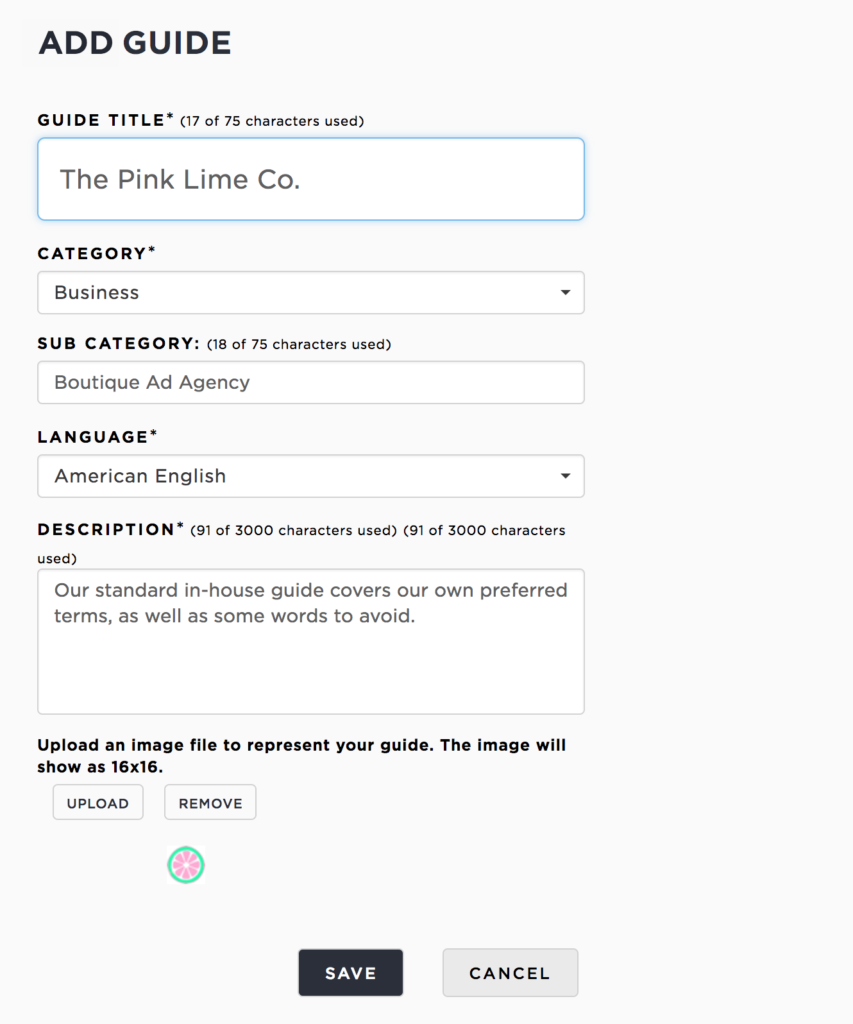
Title
Name your entries “container” here. You might choose a name based on the type of content this guide is intended for (press releases, blog posts, newsletters). You may also create it based on the subject matter (sports, advertising, gardening, furniture, animals, politics). It’s up to you.
Category
Lingofy provides a list of topics with which you can tag a guide.
Subcategory
You may want to get even more specific with your guide organization. You can enter any phrase in this field to help keep track of your entries.
Language
Your language options when creating a guide are dependent on your language selection under your Settings (in the Lingofy Manager sidebar) and your references. If you have a British English reference (Financial Times), you can select British English. If you have an American English reference (US English), you can select American English. If you have both types, you’ll be able to choose one or the other.
Description
In this field, you can explain what kind of content this guide is aimed at and how it should be used by yourself or other shared users.
Upload/Remove icon
Each of your guides can have an icon that shows in the Source column of the proofing window and in the Entries list. To add an icon image, select the “Upload” button, which will launch a file window where you can navigate to the image you want to use. Hit Remove to get rid of the image or to replace it.
Tip: Be sure the entries you add to a guide match the language selected. You wouldn’t want to include an entry for “local color” in a British English guide because your custom entries always outrank your reference terms. You’d want to make that “local colour.”
My Guides
When you are on the Style Guides screen (top image), the center is populated with any guides created by you (“My Guides”) or shared with your account (“Subscription”). You’ll see a guide’s:
- Title
- Icon (if one isn’t added, you’ll see a default icon)
- Description
- Number of entries (Words)
- Number of users
This allows you to get a simple overview of a guide’s purpose and usage. If you want more specifics, click on the guide.
Guide Details
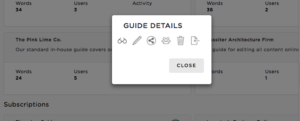 To manage a guide, click on it from the “My Guides” area and you’ll see a “Guide Details” pop-up appear (shown at right). Hovering your mouse over any of the icons in this window will provide the action name.
You can interact with a specific guide in several ways:
![]() Browse: Review, manage or edit its custom entries.
Browse: Review, manage or edit its custom entries.
![]() Edit: Change the guide’s details; the ones you added when you made the guide. You don’t edit the entries from here, just the guide details such as title, language, category and similar. Go to the “Browse” icon to see and edit entries, if permissions allow.
Edit: Change the guide’s details; the ones you added when you made the guide. You don’t edit the entries from here, just the guide details such as title, language, category and similar. Go to the “Browse” icon to see and edit entries, if permissions allow.
![]() Share: You can share a custom guide with up to five other people via email address. They will need to have or create a Lingofy account to access it. You can set their permissions with “Edit Users.”
Share: You can share a custom guide with up to five other people via email address. They will need to have or create a Lingofy account to access it. You can set their permissions with “Edit Users.”
![]() Edit Users: Here you can see a list of everybody who has access to this guide. You can also remove users, send a message to users or give/revoke user permissions (whether or not they can edit or add entries).
Edit Users: Here you can see a list of everybody who has access to this guide. You can also remove users, send a message to users or give/revoke user permissions (whether or not they can edit or add entries).
![]() Delete: You can get rid of a guide by clicking the trashcan icon. Once deleted, it is gone forever. You always have the option of removing additional users and ignoring it for a while until you are sure you want to toss it.
Delete: You can get rid of a guide by clicking the trashcan icon. Once deleted, it is gone forever. You always have the option of removing additional users and ignoring it for a while until you are sure you want to toss it.
![]() Import: You can import entries directly into a guide with this feature. For instructions on how to add tab-delimited entries using Lingofy’s Import window, check here.
Import: You can import entries directly into a guide with this feature. For instructions on how to add tab-delimited entries using Lingofy’s Import window, check here.
Subscriptions
This area of the Style Guides page displays any guides that have been shared with you by another Lingofy user or through purchase.
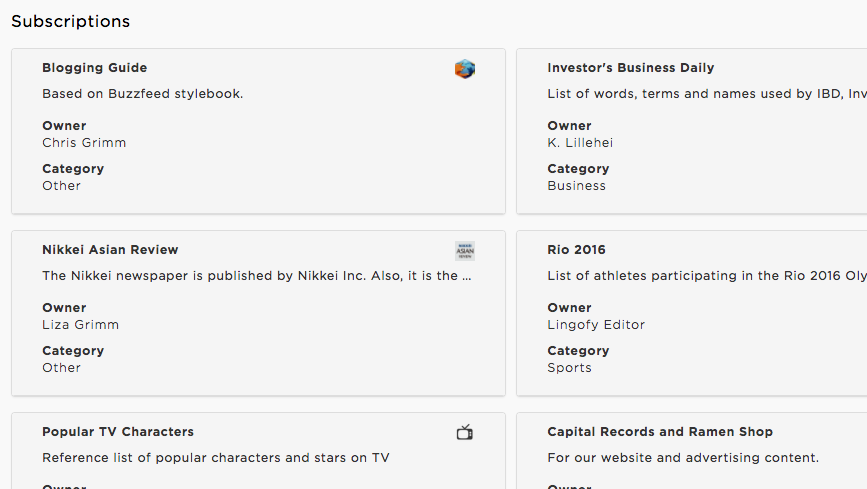
If it’s a purchased or Lingofy-created guide, you can proof with it by adding it to a proofing profile, but you will not have permission to edit its terms.
If it’s a guide that was shared with you by another Lingofy user, he sets your permissions to edit or add terms. You can proof with it by adding it to a proofing profile.
Link Guides
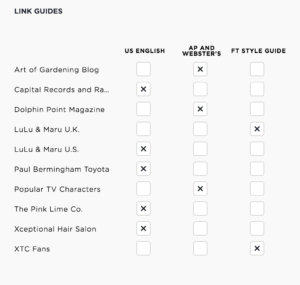
To the right of the “New Style Guide” button on the Style Guides screen is the “Link Guides” button.
Click this to go to a management screen that lets you connect or disconnect a guide from the reference (AP and Webster’s, for example) to which it is currently linked.
This affects the underlying reference (style manual or dictionary):
US English: Plain Language, Usage, Synonyms (PLUS) with Webster’s New World College Dictionary, Fifth Edition.
AP and Webster’s: AP style with Webster’s New World College Dictionary, Fifth Edition.
FT Style: Financial Times style with Oxford English Dictionary, Twelfth Edition.